The Zeno – A one-picture guide
- Tutorial Type Painting
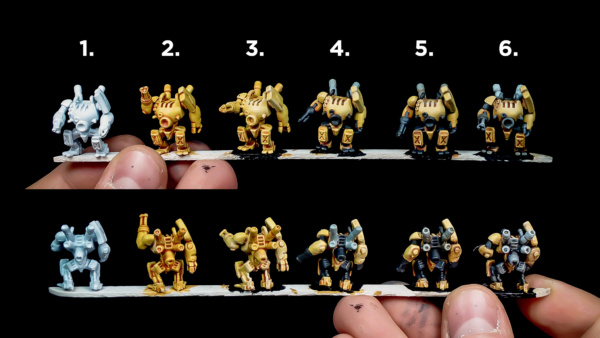
Since many asked me for a tutorial for the painting process of my Tech army (https://www.myminifactory.com/users/TheLazyForger/collection/the-tech), I guess it’s time I make one. Luckly, I decided to “sacrifice” six of my Zeno battle rigs (https://www.myminifactory.com/object/166769) when I started painting my army to build a “reference” stick in order to maintain the colour scheme coherent among the various mechs and troops. It was not initially meant as a tutorial but a personal useful tool, yet here we are.
-
White base coat. I either apply this with an airbrush or with a brush – I tend to avoid spray with 3D printed pieces, the added grip is not necessary and it’s easy to overdo and hide details. Moreover, only fancy sprays work well with Contrast paints, while most of the normal acrylics are an excellent base.
-
Contrast paint (or base color). I used Iyanden Yellow for my mechs. It’s important to skim away any stain and excess paint on the surface which would be an issue later on.
-
Drybrush phase. First, use a “wet drybrush” to flatten out the flat areas: this hides the remaining contrast stains (there will be some) and gives a more solid saturation to the flat surfaces. However, after this step the model will be very yellow. A very light drybrush with white paint reduces the saturation and enhances all the edeges in the model.
-
Paint the other materials. No need for highlights here, a simple flat colour will do for now. Especially on small scales it’s important to understand what is what: different components are made of different materials and to make it readable from distance each should have a different, identifiable color.
-
Washes. I personally am a great fan of the Army Painter Soft Tone (which is the only one of the range which is worth using, IMHO), but any wash will do. Brown tones and black tones applied in diluted should layer up until you are happy with the level of weathering and the shadows the model has acquired. Between the washes, I generally apply highlights where i want more contrast. Usually, the guns and some minor details deserve an highlight in between the washes/glazes: the strokes are blended in by the next glazes and it’s easy to control how much you want the stuff to pop!
- Final touches. First of all, some minor highlights could be added now: lights, metal parts and such. To blend it all, a very very light white drybrush will do the job!
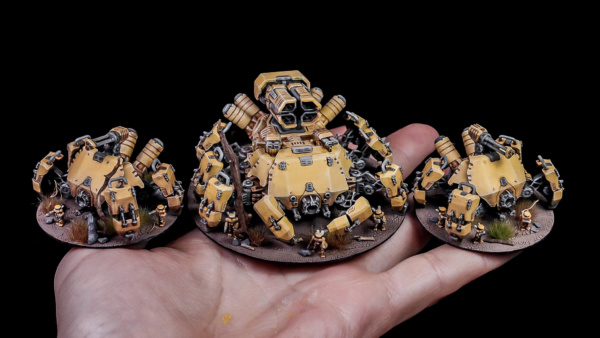
Here it is, not much more to add. Of course, it’s not always as simple as it sounds: with larger pieces such as the Plato (https://www.myminifactory.com/object/166767) having believable shades on the large armour plates took several attempts and even some wet blending. However, the general idea of this process is very simple and, in general, effective!
Cheers,
Jack


Super impressive stuff. Love the overall effect and I wish I could paint as well, Thanks for this as I’m not the best at watching painting demos but this helps to show what others do in an easy way.
Happy to be useful! 🙂